HDF(Hortonworks Data Flow) Automation with Ansible
NiFi and HDF
NiFi and HDF have become really popular in “Data Streaming”, “Data Pipeline” domains. And with the impact from Cloud providers serverless services, having your own on-prim infrastructure and maintain it becomes more and more difficult.
In one of the Big Data project, Automation is the keyword to control the maintenance cost of an on-prim HDF cluster within a reasonable range. So far Ansible has won a great position in automation orchestration tools hence it is also our choice for automating on-prim HDF cluster deployment.
Ansible
Ansible is famous for the idempotent feature as you set your target state in the ansible playbook and ansible will try to reach that target state for you. Main differences between a shell script is you can safely run your ansible playbook multiple times with a progressive delta every time there’s a need of change, which would be very tricky to reach the same goal on Shell scripts.
You could find more about Ansible over here or a quick-start-video
Solution Architecture
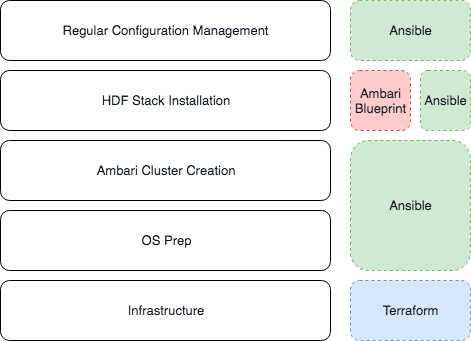
In the project we breakdown the automation into 4 stages:
- Terraform to create the infrastructure in an idempotent way
- Ansible prepare the Operation System and create the Ambari Cluster
- Ansible submit the Ambari blueprint to create a new HDF cluster (Zero-state-cluster)
- Ansible manage and activate all the configurations after the HDF cluster been created
The following stack chart shows each layer of the platform configurations and automation:

Infrastructure Layer
As you could see in the automation stack, our on-prim solution was to built EC2 instances within the company VPCs, hence we are using Terraform to initiate the cluster, Terraform could maintain a terraform state file to make idempotent possible. You could find out more about Terraform here.
Operation System Preparation & Ambari Cluster creation
OS prep
Common OS preparation tasks including:
- YUM packages and repo setup
- Python packages
- Particular components setup (e.g. JDK JCE policy setup as a mandatory tick for HDF installation)
As we were working on AWS, we have something extra like:
- hostname: EC2 instances would naturally come with a generated hostname, if your are utilizing Route 53 for all the hostname resolving. Ansible could be in place to manage all hostname changes automation
- volume mounting: If you have extra EBS volumes created for EC2 instances, those volumes need to be formatted and mounted into the instance. This could also be done via the Ansible mount module.
Ambari Cluster
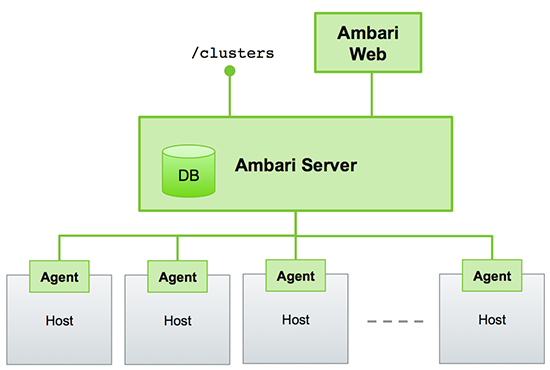
Ambari is a management tool for you to manage what Hadoop services you want to install and how you want them to be installed into your cluster. A simple architecture graph from the HWX official website says a million words:

Ansible could help install ambari-server and ambari-agent into your server and agent nodes. But there will be a GOTCHA as ambari-server setup seems not working in non-interative mode. There was a post talking about using following options:
--database= \
--databasehost= \
--databaseport= \
--databasename= \
--databaseusername= \
--databasepassword=
But this just not doing anything for me.
The solution we have is: Do the setup yourself!
All the values via ambari-server setup command will go into <ambari-server conf dir>/ambari.properties e.g. /etc/ambari-server/conf/ambari.properties, hence you could easily deal with the changes in Ansible using lineinfile module like below:
- lineinfile:
    path: /etc/ambari-server/conf/ambari.properties
    regexp: "^ambari-server.user="
    line: "ambari-server.user=\{\{ ambari_server_usr \}\}"
What about passwords? It turns out that Ambari just store them into a file in plaintext, so following module will do the trick:
- name: Prepare the password file
  copy:
    content: "\{\{ ambari_server_db_password \}\}"
    dest: /etc/ambari-server/conf/password.dat

- lineinfile:
  path: /etc/ambari-server/conf/ambari.properties
    regexp: "^server.jdbc.rca.user.passwd="
    line: "server.jdbc.rca.user.passwd=/etc/ambari-server/conf/password.dat"
After tackling these major issues, your Ambari cluster should run like a charm.
HDF Cluster deployment
The only component within the Automation stack that is not idempotent is the Ambari Blueprint. Ambari Blueprint does not support re-deployment and idempotent, once you failed in the middle of a blueprint deployment, the most common approach to ‘fix’ it is to destroy the cluster and recreate them.
Also, the life of an Ambari blueprint will be finished at the end of a cluster deployment. Which means values like:
- passwords
- endpoints
- configurations
When you include those configurations into your Ambari blueprint host_map.json file, you won’t be able to audit/change those values and reapply them again. Hence we need a higher level application to resolve this, HWX provide a sample Github repository Ambari blueprint playbook, this playbook demonstrate how to use the uri module to upload a blueprint and execute the cluster deployment via Ambari API.
We used a similar approach to reach this goal, with Ansible on top of the blueprint templates, we could use Ansible to manage the configurations and passwords. These changes could either be within an Ansible Vault file or Ansible Tower(or AWX for the open source version).
HDF Cluster Configuration Management
As all configurations are managed by Ambari, if changes are made outside of Ambari cluster configuration, it might leads to Ambari original config overrides the changes. Hence to do proper configuration management over the HDF cluster, all changes via Ambari configurations might be suggested.
To enable this, there are few modules created for ambari configurations updates and service restarts. Please refer to the github repository ansible-ambari-configuration-module, this module could provide a simple ansible task to configure certain Ambari configurations like below:
- name: Configure Ambari
  ambari_cluster_config:
    host: 172.17.0.3
    port: 8080
    username: admin
    password: admin
    cluster_name: my_cluster
    config_type: kafka-broker
    ignore_secret: true
    timeout_sec: 1
    config_map:
      log.retention.hours:
        value: 150
And then you could use another module to restart all / partial services:
- name: Configure Ambari
  ambari_service_control:
    host: 172.17.0.3
    port: 8080
    username: admin
    password: admin
    cluster_name: my_cluster
    service: all
    state: installed

- name: Configure Ambari
  ambari_service_control:
    host: 172.17.0.3
    port: 8080
    username: admin
    password: admin
    cluster_name: my_cluster
    service: all
    state: started
Please note that, since the blueprint variables are not really under control by an idempotent way, e.g. ranger db endpoint may change in the future and this db endpoint config is only used in the ambari blueprint host_map.json file, you might create another ansible audit playbook using the above modules to replicate whatever changes you put into ambari blueprint host_map.json file.
Quick Code
bindAddr = "0.0.0.0"
bindPort = 7000 # Bind port
kcpBindPort = 7001 # KCP bind port, optional configuration according to usage requirements
quicBindPort = 7002 # QUIC bind port, optional configuration according to usage requirements
vhostHTTPPort = 48080 # Virtual HTTP port, optional configuration according to usage requirements
vhostHTTPSPort = 48443 # Virtual HTTPS port, optional configuration according to usage requirements

# Allow the range of remote server ports that can be mapped by the penetration service
allowPorts = [ { start = 50000, end = 60000 } ]

auth.method = "token"
auth.token = "1234567" # Custom authorization token, the client needs to provide the correct token to penetrate

webServer.addr = "0.0.0.0"
webServer.port = 7500
# Dashboard username and password, optional, default is empty
webServer.user = "timqin" # Modify this item
webServer.password = "1234567" # Modify this item

Comments